Blog

Freezing Point Depression and Frozen Custard

Hello & welcome back to Food Science Fridays!

Last episode we talked about the texture and structure of frozen desserts, and experimented with crystal formation making a healthy frozen dessert.  Our efforts resulted in a low fat, no added sugar peach frozen yogurt made from just 3 ingredients.  It was great until I left it in the freezer for too long and it turned into a solid chunk of peach ice.

Today we are back for part 2 to discuss freezing point depression, and try out a no-churn vanilla custard recipe.  Why no- churn?  Well, I don’t happen to have an ice cream maker on hand, and I was super inspired by @CCC’s Curious Kitchen’s ice cream post the other day.  By the way, for more food science, check out her instas and blog where she breaks down the science of beautiful baked goods!

Freezing Point Depression

Alright, so why did my peach frozen yogurt turn into a popsicle, and why doesn’t most ice cream turn into a block of ice when stored in the freezer?

The answer is something called Freezing point depression.  Sound familiar anyone? 

I learned about this way back in Gen Chem, and it’s the concept that the freezing point of a solution is lower than the freezing point of pure solvent.  I won’t bore you with the actual equation, but look it up if you’re interested.  Anyways, let’s break this down.

You probably know that pure water freezes at 0°C  (32°F) (think of this as the solvent), but when you mix in a solute (something that is soluble in water like salt or sugar or alcohol), the freezing point will drop, and the more solute you add, the more the drop in freezing point.  If you live somewhere where temps drop below freezing, you might notice that it’s common to salt the roads.  Salt is used to keep the roads free from ice, so hopefully our cars don’t ice skate off the road.  You may also notice that vodka or gin or some other hard alcohols don’t freeze in the freezer.  That’s because 80 proof vodka is approximately 40% ethyl alcohol and 60% water.  While pure ethanol has a freezing point of -114.1 °C (-173.5°F), vodka freezes somewhere in between, at approximately -24 °C (-11.2°F).

Also if you’ve ever made ice cream in a bag with salt crystals, that’s using this concept of freezing point depression to quickly solidify your ice cream!

What about the fat in ice cream?

Cream is made up mostly of water and fat, so how does the fat affect the freezing point?

It doesn’t!  Oil (aka Fat) and water don’t mix, so the little fat bubbles that float around in the ice cream don’t interfere with freezing the way sugar, salt, or alcohol would.  That being said, higher fat content does mean less water, so the texture may appear different.

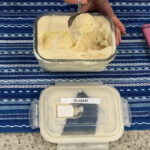
So, what can we do to prevent the block of ice we ended up with last week?

Add sugar, salt, and or alcohol!  I tried this recipe with various adjustments to the ingredients to alter the freezing temperature. See the various recipes below:

A home freezer typically ranges from from 0 to -20 °C.  Mine is reading 1°F, which is about -17°C.

No Churn Frozen Custard Experiment 1: Just Sugar

Let's try adding sugar to decrease the freezing point!
Adapted from Stella Parks No-Churn Vanilla Ice Cream Recipe published on Serious Eats 
Prep Time30 minutes
Cook Time30 minutes
Total Time9 hours
Course: Dessert
Keyword: buttercream, custard, dessert, eggs, freezer, frozen custard, frozen dessert, Ice cream, no churn, recipe, whipping cream, without an ice cream machine
Servings: 6 people

Equipment

  • stand mixer

Ingredients

  • 170 g Heavy Whipping Cream (approximately 3/4 cup)
  • 3 eggs Large (approximately 155 g)
  • 100 g sugar (approximately 1/2 cup)

Instructions

  • Whip the cream until thick enough to hold stiff peaks; the time will vary depending on the mixer.  Transfer to a container and store in the refrigerator. 
  • Rinse the bowl and whisk, and wipe dry.
  • Fill a pot with approximately 2 inches of water and bring to a boil. Lower heat to a simmer ( to maintain simmer I kept the heat very close to low). Place whole eggs and sugar in the bowl of a stand mixer, and whisk to combine. Place bowl over the steaming pot, making sure bottom does not actually touch the water.  Whisk egg mixture constantly, and cook until a thermometer placed in the center of the egg mixture reads 160°F (71°C).  This should take approximately 5 minutes.
  • Transfer bowl to a stand mixer fitted with a whisk attachment (or use a hand held electric mixer). Whip on high speed until the mixture is at the ribbon stage: foamy, tripled or quadrupled in size, and about the consistency of soft serve ice cream.  This should take anywhere from 5-10 minutes.
  • Fold the prepared whipped cream into the egg mixture, working gently to incorporate it as thoroughly as possible without deflating or over mixing the base.
  • Using a spatula, carefully scrape into a chilled container, cover, and freeze until firm enough to scoop.
  • If you’re doing the experiment wait at least 8 hours before comparing your results.

Notes

Experiment 1: Calculating Freezing Point Depression
170g heavy cream (60 g fat, 110 g H2O)
155g 3 large eggs (38 g H2O/egg x3= 114 g H2O)
100 g sugar (1 mol sugar= 342.3 g) 100/342.3 = .29 mol
This ice cream contains approximately:
224 g H2O  100 g sugar (.29 mol) Molality= .29 mol/.224kg = 1.30 mol/kg
cryoscopic constant of water (1.853 °C·kg/mol).
ΔTF = – KF · m · i = -1.853 · 1.30 · 1 = -2.4°C

No Churn Frozen Custard Experiment 2: Sugar + Salt

Adding Salt in addition to sugar to lower the freezing point
Total Time9 hours
Course: Dessert
Keyword: dessert, eggs, frozen custard, Ice cream, ice cream made with eggs, ice cream recipe, no churn, vanilla bean
Servings: 6 people

Equipment

  • Electric mixer

Ingredients

  • 170 g Heavy cream
  • 3 large eggs
  • 100 g sugar
  • 2 g salt

Instructions

  • Whip the cream until thick enough to hold stiff peaks; the time will vary depending on the mixer.  Transfer to a container and store in the refrigerator. 
  • Rinse the bowl and whisk, and wipe dry.
  • Fill a pot with approximately 2 inches of water and bring to a boil. Lower heat to a simmer ( to maintain simmer I kept the heat very close to low). Place whole eggs and sugar in the bowl of a stand mixer, and whisk to combine. Place bowl over the steaming pot, making sure bottom does not actually touch the water.  Whisk egg mixture constantly, and cook until a thermometer placed in the center of the egg mixture reads 160°F (71°C).  This should take approximately 5 minutes.
  • Transfer bowl to a stand mixer fitted with a whisk attachment (or use a hand held electric mixer). Whip on high speed until the mixture is at the ribbon stage: foamy, tripled or quadrupled in size, and about the consistency of soft serve ice cream.  This should take anywhere from 5-10 minutes.
  • Fold the prepared whipped cream into the egg mixture, working gently to incorporate it as thoroughly as possible without deflating or over mixing the base.
  • Using a spatula, carefully scrape into a chilled container, cover, and freeze until firm enough to scoop.
  • If you’re doing the experiment wait at least 8 hours before comparing your results.

Notes

Tasting Notes:  This came out a bit saltier than ideal.  If not running this as an experiment, I would reduce the salt to 1 g.

No Churn Frozen Custard Experiment 3: Sugar + Salt + Bourbon

In this experiment, we are adding alcohol to the mix to see how it might affect the freezing point
Prep Time30 minutes
Cook Time30 minutes
freezing8 hours
Total Time9 hours
Course: Dessert
Keyword: bourbon, cold dessert, cream, food science, frozen custard, frozen dessert, Ice cream, no churn, vanilla bourbon, without an ice cream maker
Servings: 6 people

Equipment

  • Electric mixer

Ingredients

  • 170 g heavy whipping cream
  • 3 eggs large
  • 100 g sugar
  • 1 g salt
  • 1.5 ounces Bourbon 1 shot)

Instructions

  • Whip the cream until thick enough to hold stiff peaks; the time will vary depending on the mixer.  Transfer to a container and store in the refrigerator. 
  • Rinse the bowl and whisk, and wipe dry.
  • Fill a pot with approximately 2 inches of water and bring to a boil. Lower heat to a simmer ( to maintain simmer I kept the heat very close to low). Place whole eggs, sugar, and salt in the bowl of a stand mixer, and whisk to combine. Place bowl over the steaming pot, making sure bottom does not actually touch the water.  Whisk egg mixture constantly, and cook until a thermometer placed in the center of the egg mixture reads 160°F (71°C).  This should take approximately 5 minutes.
  • Transfer bowl to a stand mixer fitted with a whisk attachment (or use a hand held electric mixer). Whip on high speed until the mixture is at the ribbon stage: foamy, tripled or quadrupled in size, and about the consistency of soft serve ice cream.  This should take anywhere from 5-10 minutes. Slowly add the bourbon whisking in so that the foamy egg structure is not destroyed.
  • Fold the prepared whipped cream into the egg mixture, working gently to incorporate it as thoroughly as possible without deflating or over mixing the base.
  • Using a spatula, carefully scrape into a chilled container, cover, and freeze until firm enough to scoop.
  • If you’re doing the experiment wait at least 8 hours before comparing your results.

Sources

  1. Effect of Ingredients in the Ice Cream Mix on its Freezing PointParfitt, E.H. et al.  Journal of Dairy Science, Volume 8, Issue 3, 230 – 237https://www.journalofdairyscience.org/article/S0022-0302(25)93958-6/fulltext#:~:text=1.,sucrose%20added%20to%20the%20mix.
  • Brown, A. (2014). Understanding Food: Principles and Preparation. United States: Cengage Learning.

Other Blog Posts and Websites on this topic

  1. Freezing Point Depression.  Chemistry.  Purdue University. https://www.chem.purdue.edu/gchelp/solutions/freeze.html

A Healthy Frozen Dessert Experiment made from Fruit

Ice cream, fro yo, sherbet, sorbet, granita… I will go for whatever Frozen dessert is available to me on a hot summer day like today.

Welcome back to another episode of food science Fridays.  Today we’re making sorbet…  well, sort of.

Different Types of Frozen desserts

I recently got a request to make a healthy dessert, and given that it’s hot out, my mind immediately jumped to ice cream. 

Healthy is not a very descriptive term, and can mean different things to different people, but when I think about healthy I think about adding fruits and vegetables.  Now there’s nice cream, which is basically a kind of frozen smoothie bowl made from frozen bananas which tastes a lot like ice cream, but I really wanted to make something different with the fresh fruit I had lying around.  So instead, we are going to make a kind of peach sorbet.

I’ve always considered sherbet and sorbet to be types of ice cream, but they’re actually not.  These frozen desserts have a have an iced fruit or fruit juice base, making their fat content much lower than ice cream.  Sherbet is made with egg whites or gelatin and contains less than 2% milk fat, and often has more sugar than ice cream.  Sorbet on the other hand is typically made without fat, eggs, gelatin, or dairy.  By law, in the US, ice cream must contain at least 10% milk fat

But first, let’s talk structure!

The Structure & Texture of Frozen Desserts

The texture of frozen desserts depends largely on the crystallization of the water in the dessert.  Crystals are formed upon freezing when the water molecules align, resulting in polyhedral structures we call crystals.  The structure of ice cream is really a foam of air bubbles trapped in a frozen liquid.  Anyways, I’ll discuss the structure specific to ice cream in greater detail when I do a full ice cream episode, but today I’m making peach frozen yogurt.

The texture of all frozen desserts depends on the size of the ice crystals that form during freezing.  The smaller the crystals, the smoother and creamier the texture.  In fact the water crystals in should be so small that we cannot feel them on an individual level. 

So, basically, to make a good frozen dessert, we need to do our best to disrupt formation of large crystals, and luckily we know how!

A standard ice cream maker will churn air into the ice cream as it freezes avoiding large crystal formation.  Instead, we are going to use a food processor to basically “churn” our frozen dessert after its been frozen.

Also, fat globules obstruct the growth of ice crystals which can slow the rate of recrystallization during storage & also lubricate the palate helping us perceive a smoother texture.

Results

Crystals look okay, but without added sugar, the dessert has frozen solid.  Next week, we’ll be back to talk about freezing point depression.


Sources:

Brown, A. (2014). Understanding Food: Principles and Preparation. United States: Cengage Learning.

Earl Grey Vanilla Bean Birthday Cake with Lemon Buttercream Frosting

For Matt’s birthday this year, I went into the archives and made this classic Earl Grey vanilla bean tea cake that’ll please even the tea cake skeptics out there.

Now, I’m going to share a secret: I had never actually made cake with cake flour, which shows that I’m not exactly cake savvy or cakexperienced. Previous times I’ve made this cake, it’s always been slightly denser and dryer than I like, so this time I went out of my way to grab cake flour.

Here’s why you should consider cake flour:

Cake flour contains 7-9% protein, while all-purpose has about 10-12%. This means that all-purpose flour is higher in gluten than cake flour, though not as high as bread flour. While gluten is great for bread, gluten development is not ideal for cakes. After all you probably want a cake that is nice and light and fluffy not as hole-y or gummy as bread.

If you can’t get your hands on cake flour, some bakers suggest replacing a tbsp or 2 of all purpose flour with cornstarch or arrowroot flour, but I have yet to do this.

To my more experienced cake connoisseurs, shout out in the comments sections with any other recommendations!

Earl Grey Vanilla Bean Cake with Lemon Buttercream Frosting

Surprise the Earl Grey fan in your life with this exciting birthday cake!
Prep Time2 hours
Cook Time30 minutes
Course: Dessert
Cuisine: British
Keyword: buttercream, cake, earl grey, tea
Servings: 12

Equipment

  • 9" cake pans

Ingredients

  • 1 pod vanilla bean
  • 1 cup whole milk
  • 2 tbsp loose leaf Earl Grey Tea
  • 2 cups cake flour
  • 2 tsp baking powder
  • 1 tsp finely ground loose leaf Earl Grey tea
  • 1 tsp salt
  • 3/4 cup butter at room temperature
  • 1.5 cup sugar
  • 3 eggs

Frosting

  • 1 cup butter softened at room temperature
  • 2 tbsp buttermilk
  • zest from 2 lemons
  • 1 tbsp lemon juice

Instructions

  • Start by heating milk, loose leaf tea, and vanilla bean in a small pot or sauce pan over medium heat. Do not boil, but bring to a low simmer and steep for at least 10 minutes. Strain tea out of milk and scrape vanilla bean paste from pod into milk for added vanilla flavor.
  • Remove from heat and set aside to cool to room temperature (or place in the fridge)
  • Preheat oven to 350F
  • Grease and flour two 9" cake pans
  • Sift dry ingredients (flour, baking powder, tea, and salt) into a large mixing bowl and mix to combine. Set aside dry ingredients.
  • Using a mixer (or by hand), cream butter and sugar with the paddle attachment on high until light and fluffy.
  • Reduce speed to medium-low and add eggs one at a time.
  • Slowly mix in Earl Grey infused milk.
  • Reduce speed to low and mix in flour mixture, making sure to mix only until smooth and well combined (over-mixing may result in a tougher texture).
  • Pour cake batter into greased cake pans, tapping pan bottom to create an even top.
  • Bake for approximately 30 minutes or until a toothpick comes out mostly clean
  • Set cakes aside to cool as you whip up the frosting.

For the Frosting

  • In your mixer, beat softened butter, and powdered sugar until combined.
  • Add buttermilk and lemon zest and cream together on low adding more powdered sugar if needed until frosting is creamy, and texture is to your liking
  • Add lemon juice until incorporated
  • You can always add additional powdered sugar or buttermilk to get to the desired consistency.

Assembling the Cake

  • Once cake is cool, carefully remove from pan and gently place first layer top down on cake stand or serving plate.
  • Top with layer of buttercream, trying your best to spread evenly across the top.
  • Place second layer of cake gently atop first and begin frosting by layering the top with frosting, leaving a slight overhang before starting on the sides. For a smooth coat of frosting, refrigerate for 15 minutes before smoothing with a final layer.

Panna Cotta & the Three Phases of Gelatin Formation

Welcome back to Food Science Friday.  Today we’re diving into our first dessert on the show, and making Panna Cotta.  Happy Friday!

What is panna cotta?

Panna Cotta essentially means cooked cream in Italian, and it is a dessert made of sweetened cream and gelatin.  It’s texture is kind of reminiscent of pudding or jello, which are often also made with gelatin, but panna cotta cooked right has this incredibly smooth mouth feel.

What gives panna cotta its texture?

Panna Cotta is a gel and it’s the gelatin that gives this panna cotta its structure/texture.  Gelatin is a mix of proteins often extracted from the collagen in hides, bones, and connective tissue of animals, but there are some vegan and vegetarian alternatives as well.

Gelatin typically comes as a powder, but it can also be found in sheets.  For this recipe we’ll be using the powder form.  Gelatin contains long thin protein strands, which give it its unique ability to form a gel.  These molecules when heated and cooled will form a network by creating cross links among themselves, and trapping the water molecules within the protein strands, which creates an elastic solid.

There are three phases of gel formation, and before we apply heat, we’ll need to bloom the gelatin, so let’s get blooming!

Three Phases of Gel Formation

1. Hydration:

The first phase is Hydration- Gelatin can absorb approximately  5-10 times it’s weight! To bloom, sprinkle the gelatin granules over the milk and let stand for 3-5 minutes.

Unflavored gelatin will clump if not properly hydrated in cool or room temp water before applying heat. 

2. Dispersion

The second phase is dispersion- after hydrating or blooming your gelatin transfer to a saucepan and stir over medium heat just until the gelatin dissolves, not boils.  Gelatin disperses at approximately 100 deg F (38 C), so it doesn’t need to boil.  During dispersion, the protein molecules in the gelatin will denature and unfold.

3. Gelation

The third phase is gelation and occurs when you cool the mixture.  Upon cooling, the denatured proteins will begin to aggregate.  The mixture will first convert to a sol, which is a colloidal dispersion of a solid dispersed in a liquid.  Then after a few hours in the refrigerator, it will then create a more solid-like gel.

Earl Grey Vanilla Panna Cotta

A British take on a classic Italian dessert, learn how to make this easy but impressive dessert
Prep Time1 hour
Cook Time20 minutes
Resting Time6 hours
Course: Dessert
Cuisine: British, Fusion, Italian
Keyword: cream, dessert, gelatin, Panna Cotta, pudding
Servings: 6

Ingredients

  • 1 cup milk
  • 2 cups cream
  • 2 pods vanilla bean
  • 2 tbsp earl grey tea loose leaf
  • 2 tsp. unflavored gelatin
  • cup sugar

Instructions

  • Heat 2 cups cream + 1 cup milk over medium heat and bring to a light simmer (DO NOT Boil)
  • Add vanilla bean and earl grey tea and allow to infuse for 15-20 minutes (if you prefer a stronger flavor you can remove from heat, refrigerate and leave in fridge over night)
  • Once you are happy with the flavor, remove from heat, and pass through a strainer to strain out tea leaves, and use a knife or spoon to scrape out the gooey seeds from the vanilla bean. Discard the rest of the pod, but stir in the gooey seeds.
  • Place flavored cream in the refrigerator to cool to room temperature (if short on time you can also do this in the freezer, but be careful not to freeze)
  • To bloom gelatin, add 2 tsp of unflavored gelatin to cool or room-temperature infused cream
  • Stir with a whisk and let sit for 3-5 minutes
  • Place over medium heat and stir until gelatin is dispersed but again do not boil
  • At this point you can add 1/3 cup sugar to warm cream and mix until dissolved
  • Pour mixture into glass jars and refrigerate for at least 6 hours
  • Garnish with fresh lemon zest, edible flowers, and or fresh fruit

Video


Sources:

Brown, A. (2014). Understanding Food: Principles and Preparation. United States: Cengage Learning.

You can’t Stop the Beet!

You can’t stop the beet.

Just beet it.

If you can’t beet em join em!

Enough with the beet puns.  Welcome back to another episode of food science Fridays.  Now I know beets aren’t everyone’s favorite root vegetable after all they take forever to cook, stain your hands, can make your pee/poop red, and sometimes taste like dirt, but they’re actually a pretty fun and versatile veggie to add to your plate.

Why are Beets Red?

While not all beets are red, beets tend to be known for their deep dark red color.  If you remember from the eggplant episode, a class of flavonoids known as anthocyanins are what we typically think of when we think of foods that are reddish or purple in color.  They light up cranberries, apples, blueberries… but another class of compounds contribute to beets’ distinctive red.

Betalains, specifically betacyanins are these pigments that contribute to that beet red color.  Betalains are highly- water soluble and susceptible to light, oxidation, and heat.

Betalains are made from the amino acid tyrosine, a building block of many compounds that are made by plants.  In beet plants, the enzyme responsible for production of tyrosine has been found to have unusual activity. 

Beets produce a lot more tyrosine than most other plants.  Research suggests that beets evolved to develop enzymes that use extra tyrosine to create betalains, which may help plants weather stress and may even attract pollinators.

Why do beets sometimes taste earthy?

Beets get their earthy flavor from a chemical called geosmin, which is often found in soil… where beets are obviously also found.  Geosmin is produced by a number of microorganisms found in soil including multiple types of bacteria and fungi.  How cool is that!  A few studies have suggested that beets themselves may also be capable of synthesizing their own geosmin, making them extra earthy!

Geosmin can be degraded by acid, rendering it more palatable to folks that are not fans of that earthy flavor. If you’re not a fan of that earthy flavor, try adding something acidic like vinegar or lemon juice to your beets!

Beet, Mint, and Goat Cheese Salad

Summer salad featuring roasted beets and fresh mint
Prep Time1 hour
Keyword: beet, mint, salad
Servings: 4

Ingredients

  • 2 beets
  • 1/2 cup water
  • 2 tsp. salt
  • 4 cups arugula
  • 1 stick goat cheese
  • 1/4 cup roasted pepitas or sunflower seeds
  • 1 handful fresh mint chopped
  • 2 tbs. olive oil
  • salt to taste

Instructions

  • Peel and slice beets into chunks no bigger than the size of your thumb.
  • In a medium sized microwavable bowl, place beet pieces, water, and salt. Cover bowl with a microwavable plate, and microwave on high for 25 minutes or until tender.
  • Let cool to room temperature before preparing your salad.
  • Layer salad bowl with arugula, beets, freshly chopped mint, pepitas, and goat cheese.
  • Toss with olive oil, balsamic vinegar, and salt to taste.

Video


Sources:

Lopez‐Nieves, S., Yang, Y., Timoneda, A., Wang, M., Feng, T., Smith, S.A., Brockington, S.F. and Maeda, H.A. (2018), Relaxation of tyrosine pathway regulation underlies the evolution of betalain pigmentation in Caryophyllales. New Phytol, 217: 896-908. doi:10.1111/nph.14822

Dunn, Steve.  “Beet Salad in Less Than an Hour.”  Cooks Illustrated.  https://www.cooksillustrated.com/articles/1178-beet-salad-in-less-than-an-hour

Jiang J, He X, Cane DE. Biosynthesis of the earthy odorant geosmin by a bifunctional Streptomyces coelicolor enzyme. Nat Chem Biol. 2007;3(11):711-715. doi:10.1038/nchembio.2007.29

Eggplants and Anthocyanins

Welcome back to another episode of Food Science Fridays.  Today we’re talking all about the eggplant or aubergine as others around the world call it.  Until a few weeks ago eggplant was my favorite vegetable, when I found out it’s a fruit.  Yep apparently eggplant is a fruit.

Eggplant not a lot of people’s favorite fruit or vegetable, although the emoji apparently is very popular. People often tell me aubergines are too bitter or the texture too spongey, but I’m here to tell you that it doesn’t have to be.  Eggplant when prepared properly should be mild in taste and soft in texture.  So, let’s break it down, before we make one of my favorite eggplant dishes.

Why are eggplants purple?

While there are many types of eggplants, most of them are some shade or variation of purple, and this is due to the presence of anthocyanins, which are members of the flavonoid group of phytochemicals, and are often responsible for the colors red, purple, and blue in many fruits and vegetables.  Anthocyanins are phenolic compounds and are responsible for both the bitter taste of eggplants and the browning that occurs rapidly when the eggplant is cut.

Why do eggplants brown when cut?

When you cut an eggplant, the enzyme polyphenol oxidase converts the phenolic compounds into quinones, which can then polymerise.  This is why eggplant will brown rapidly when cut.

How to quickly cook eggplant

Salting

To prevent your chopped eggplant from soaking up a lot of oil and also the enzymatic browning reaction, try salting your eggplant and letting sit for 30 minutes.

Salting draws water from the eggplant cells through osmosis, filling the air pockets and collapsing the sponge structure.  This allows you to cook in less oil, and will also speed up the cooking time.

Spicy Curried Eggplant

Quick and easy roasted eggplant in less than an hour
Prep Time1 hour
Cook Time40 minutes
Course: Appetizer, Main Course
Cuisine: Fusion, Mediterranean
Keyword: curried eggplant, easy roasted eggplant, eggplant, recipe, spicy eggplant, veggie dishes
Servings: 10

Ingredients

  • 1 onion
  • 3 eggplants Italian
  • 2 tbsp olive oil
  • 2 tsp kosher sea salt
  • 3 tsp Curry powder (I use Frontier's curry powder which has turmeric, paprika, and fenugreek)
  • 1 pint Cherry tomatoes

Instructions

  • Dice onion into small pieces
  • Chop eggplant into cubes (no bigger than your thumb)
  • Toss salt with eggplant and let stand for 30 minutes
  • Meanwhile, cut tomatoes into quarters
  • Preheat oven to 415 deg F
  • Spread eggplant, onion, and tomatoes on sheet pan
  • Top with oil and spices.
  • Bake for 40 minutes flipping halfway through.

Sources:

Khoo HE, Azlan A, Tang ST, Lim SM. Anthocyanidins and anthocyanins: colored pigments as food, pharmaceutical ingredients, and the potential health benefits. Food Nutr Res. 2017;61(1):1361779. Published 2017 Aug 13. doi:10.1080/16546628.2017.1361779

Scrambled Egg Science

Eggs are one of the most versatile ingredients from the sweetest merengues to the creamiest custards, and of course a nice savory and nutritious breakfast!

Let’s explore what makes the egg so incredible and useful in the kitchen by going back to basic kitchen chemistry and making some nice fluffy scrambled eggs.

Egg Structure

As we open up the egg, we tear apart the protective shell membranes and air cell to get to the yolk and albumen (or egg white). The white contains about 60% of the total protein in an egg and the yolk has the other 40! 

More than half of the protein in eggs is ovalbumin, which gives the egg its unique properties. and happens to denature easily upon application of heat.

When you apply heat, you are basically sending a jolt of energy (that’s what heat is).  This agitates the egg proteins causing them to bounce around and collide with other proteins.  The proteins made up of long amino acid chains begin to loosen from their folded structures (denature), and these loose protein strings become tangled in a kind of 3-D web, turning the egg into a semi-solid state.  As more heat is applied, bonds break and reform, leaving less space for the water, and eventually most of the water evaporates out.  The egg proteins coagulate and creates what we think of as scrambled eggs.

But here’s the catch, egg white and egg yolks coagulate at different temperatures.  Egg whites start to coagulate at approximately 140 deg F (60 deg C), but or yolks slightly warmer temps of 144-158 deg F are needed for coagulation.  Interestingly enough, when you beat eggs they coagulate at about 156 deg F or 69 deg C.

So, now that we’ve got the basic science down, how do we make perfect scrambled eggs?

How to make the perfect scrambled eggs:

1. Add a liquid

Add approximately 1 tbs or less milk, water, or cream per egg and beat with a whisk.  Adding milk, water, or cream dilutes the proteins, which in turn raises the coagulation temperature to approximately 175 deg F (79 deg C).  Although the eggs will take longer to cook, they will be fluffier, because the added liquid will create steam during cooking, lifting the egg and creating a soft fluffy texture. Here I’m adding whole milk as I enjoy the texture and taste best when I add milk.

But caution, if you add too much liquid.  It will make the eggs watery and form small tough rubbery curds- not what we want!

 2. Cook on medium-low heat

Add a dash of oil or butter to keep eggs from sticking and heat pan on medium to low heat.

Cooking on high, means running the risk of overcooking your eggs.  When heat is applied for too long, the protein web tightens and retains so little water, that the white takes on a rubbery texture and the yolk becomes chalky.  Are chalky and rubbery what you want in a scrambled egg?  No. Cook on medium to low, and remember, patience is required to reach perfection.

3. Stirring is a matter of personal preference

Too much stirring will break the egg into many small pieces.  For some dishes this may be desirable.  In fact, the French style scrambled eggs are cooked over very low heat and whisked constantly to create a custard-like pourable texture with very small curds, but the drawback is that you lose some of the fluffiness this way, as constant whisking disturbs the protein network allowing the trapped gas and water vapor to escape. 

Instead, try gently lifting the egg repeatedly with a spatula so the undercooked portion slides beneath.

4. Remove from heat early.

Make sure to remove from heat a little before the eggs reach the desired texture as the eggs will continue to cook a bit in the hot pan.  It’s better to take them off a bit early as you can always put them back on the burner if they are still undercooked.

And there you have it!


Resources

López-Alt, J. K. (2015). The Food Lab: Better Home Cooking Through Science. United Kingdom: W.W. Norton, Incorporated.

Brown, A. (2014). Understanding Food: Principles and Preparation. United States: Cengage Learning.

All About Onions

Welcome back to another episode of Food Science Friday where we’re talking chemistry in the kitchen during quarantine!

Today we are discussing a topic that just makes me so emotional.  In fact, I get so emotional over this vegetable that I’m having to wear my sunglasses indoors, because I couldn’t find my chem lab goggles.

That’s right!  Today we’re talking onions.

Ever wondered why onions make you cry?

It’s not because onions make you emotional.  Onions contain amino acid sulfoxides, which become sulfenic acid in the onion cells. When you cut an onion, you’re breaking the cells of the onion and allowing the lachrymatory factor synthase enzymes to mix with the sulfur containing compounds, which produces something called propanethiol S-oxide, a volatile gas, which is the lacrimatory factor.[1]  The gas actually reacts with the tears in your eyes (already irritated) to form sulfuric acid, which burns and causes more tears![2]

Luckily, there’s a way to slow down the reaction, so let’s go back to basic biochem and talk enzyme kinetics. 

You may remember that the rate of an enzyme-catalyzed reaction often increases as the temperature is raised. A ten degree Celsius rise in temperature will increase the activity of most enzymes by 50 to 100%.  So, one way to slow down the chemical reaction is to keep the onions cool.[3] 

This image has an empty alt attribute; its file name is copy-of-copy-of-blue-brushstroke-moms-influencer-asymmetry-facebook-post-set.png
The rate of an enzyme-catalized reaction will
often increase as temperature increases

So, pro-tip try storing your onions in the fridge before chopping. You might also try dunking them in boiling water to denature the proteins, but I’ve never tried that. Anyways, we’ve stored these onions in the fridge, so let’s get to work!

Perfect Caramelized Onions

Directions

  1. Slice your onions into strips.
  2. Place a large pan on the stove with 2 tbs. olive oil and heat on medium high.
  3. Once pan is warm, toss your onions in with 1 tsp. salt and distribute evenly.
  4.  Cook on medium- high for about 10 minutes or until onions start to stick to the pan
  5. Turn down the heat to medium-low
  6. Add liquid and stir with a spatula, scraping some of the savory brown bits off the pan and keep the onions from burning
  7. Cook low and slow for approximately 45 minutes, stirring occasionally, until onions are soft, fragrant and a beautiful caramel color.
  8. Add to your favorite dishes!

So, let’s Break down what’s happening.

The term caramelizing onions is actually a bit misleading as there are multiple chemical reactions taking place side by side that lead to the gorgeous brown color and deep flavors that we attribute to the caramelization of onions.  These non-enzymatic browning reactions include both caramelization and the Maillard reaction.

Caramelizing is the oxidation of sugar that results in a brown color and tasty nutty flavor.  When you apply heat to onions, and the onions reach a certain temperature the complex sugar molecules of the starch (poly and disaccharides) that are present in onions are broken down into monosaccharides (single sugar molecules).  If heating continues, these sugars will essentially melt and start to become smooth and glossy.  Different sugars caramelize at different temperatures, and we know that fructose will caramelize at approximately 230 degrees F or 110 degrees C.  This results in the darker color and sweeter taste.[4][5] 

This image has an empty alt attribute; its file name is blue-brushstroke-moms-influencer-asymmetry-facebook-post-set.gif
The Maillard Reaction

The Maillard reaction on the other hand, is a reaction between heated sugar and amino acids.  It occurs in 5 steps: condensation, rearrangement, fragmentation, Strecker degradation, and polymerization.  In the first step, sugar (the free carbonyl group on reducing sugars) reacts with certain amino acids (those with free amino groups) when heated.  The amino acid involved actually partially determines the resulting flavor.  The subsequent steps may vary.

The pH and moisture level can impact the Maillard reaction.  Many people will add baking soda as an alkaline environment will stimulate the reaction by deprotonating the amino groups.  I like to add salt to speed up the process, as[6]  the salt will draw out some of the moisture, and increase the rate of the Maillard reaction[7].

I also add bit of wine or dry vermouth when the onions stick to the bottom of the pan as I find it adds flavor.


[1]Silvaroli JA, Pleshinger MJ, Banerjee S, Kiser PD, Golczak M. Enzyme That Makes You Cry-Crystal Structure of Lachrymatory Factor Synthase from Allium cepa. ACS Chem Biol. 2017;12(9):2296–2304. doi:10.1021/acschembio.7b00336

https://www.ncbi.nlm.nih.gov/pmc/articles/PMC5693239/

[2] Block, Eric. “The Chemistry of Garlic and Onions.” Scientific American, vol. 252, no. 3, 1985, pp. 114–121., www.jstor.org/stable/24967598. Accessed 16 Apr. 2020.

[3] Silvaroli JA, Pleshinger MJ, Banerjee S, Kiser PD, Golczak M. Enzyme That Makes You Cry-Crystal Structure of Lachrymatory Factor Synthase from Allium cepa. ACS Chem Biol. 2017;12(9):2296–2304. doi:10.1021/acschembio.7b00336 https://www.ncbi.nlm.nih.gov/pmc/articles/PMC5693239/

[4] https://www.sciencedirect.com/science/article/abs/pii/026087749590054F

[5] Formation of sucrose pyrolysis products

Robert Reiner Johnson, E. D. Alford, and Glenn W. Kinzer

Journal of Agricultural and Food Chemistry 1969 17 (1), 22-24

DOI: 10.1021/jf60161a013

[6] Control of Maillard Reactions in Foods: Strategies and Chemical Mechanisms

Marianne N. Lund and Colin A. Ray

Journal of Agricultural and Food Chemistry 2017 65 (23), 4537-4552

DOI: 10.1021/acs.jafc.7b00882.  https://pubs.acs.org/action/showCitFormats?doi=10.1021%2Facs.jafc.7b00882&include=cit&format=ris&direct=true&downloadFileName=acs.jafc.7b00882&href=/doi/10.1021/acs.jafc.7b00882

[7] Mitra J, Shrivastava SL, Rao PS. Onion dehydration: a review. J Food Sci Technol. 2012;49(3):267–277. doi:10.1007/s13197-011-0369-1

Japanese Hokkaido Milk Rolls

So… It’s been almost a year since I’ve posted on food science, but quarantine is bringing out the kitchen chemist in me again, so let’s chat kitchen chemistry for this first episode of Food Science Friday!

After all of the questions I received over the weekend on the Japanese Hokkaido milk buns I posted on Instagram, I thought I’d kick off Food Science Fridays with the Tangzhong method, and walk you through making your own fluffy Japanese milk bread this week.

Tangzhong is a Japanese technique where you heat a percentage of the flour and liquid until it forms a soft gel before combining with the remaining ingredients.  The result is an amazing fluffy dough, and is a great technique for most yeast breads.  I’ve actually used this in a challah recipe to great success!

So, how does the tangzhong method work? 

Heating the starch containing flour in a liquid causes the starch granules to swell, a process known as gelatinization. The water is gradually absorbed and trapped resulting in a gel that is thermo-irreversible, meaning it will not melt upon heating.  The heated liquid allows the flour to absorb about twice as much liquid as a cool or lukewarm liquid that is typically added to bread dough, and the starch is actually able to hold onto that extra liquid throughout the kneading, baking, and cooling process.

This means that bread will retain more liquid during baking and may rise higher during baking due to the creation of more internal steam in addition to the CO2 given off by the yeast.  The resulting Bread will also be moist and soft!

So, let’s try it out!

Japanese Hokkaido Milk Rolls

Adapted from this recipe by Julia Moskin in the New York Times

Ingredients

For the Starter:

  •  cup flour
  • ½ cup milk
  • ½ cup water

For the Dough:

  • 2 ½ cups flour (I used all purpose, but bread flour is ideal)
  • 1/4 cup sugar
  • 1 packet active dry yeast
  • 1 teaspoon kosher salt
  • 1 egg
  • ½ cup whole milk
  • 4 tablespoons butter (warm/softened)

Directions

In a small heavy pot, whisk 1/3 cup flour, 1/2 cup milk and 1/2 cup water over medium to low heat and cook, stirring often, until thickened but still pourable, about 7-10 minutes. When ready, the spoon will leave tracks on the bottom of the pot. Place starter in a measuring cup and set aside to cool to room temperature while you prepare the dough.

In a large mixing bowl combine flour, sugar, yeast and salt, and mix.

Add egg, milk , and 1/2 of the starter to dry ingredients and mix until combined.

Turn dough out onto a floured surface and knead for 5-10 minutes.

Add the softened 4 tbsp of butter and continue to knead for approximately 10 minutes, and shape kneaded dough into a ball. The dough should be nice and smooth.

Lightly oil the inside of a bowl and place dough inside. Cover with plastic wrap or a kitchen towel and let rise for an hour (dough should be about doubled in size).

Carefully press dough (punch) down with your hands and turn out onto floured surface. Use a knife to separate dough into eight equal pieces and shape into equal sized balls.

Butter a 9 inch circular pan (I used a cake pan). Place balls next to each other in the pan, cover again, and let rise for another 45 minutes to an hour. Dough should be very fluffy and peak out from atop the edges of the pan.

Preheat oven to 350 degrees F. Brush the rolls with milk, and place in the middle of the oven. Bake at 350 F for 25-30 minutes or until rolls are nicely puffed and golden brown.

Remove from oven and let cool for at least 45 minutes before removing from pan.